Saturday, January 29, 2022

Ice Balls


The frozen cubes that come out of your freezer's ice maker are beyond disgusting. They are a pale, milky white and appear to be a frozen ice core of Jurassic fish roe. The reason the ice is white is because it is full of impurities. Looks bad. Tastes bad. Melts bad.

And everyone has a solution to get rid of the white impurities in that ice. Boil the water three times before you put it in the tray. Use distilled water. Use fresh spring water. Well, all of those are wrong. If you want perfectly shaped, crystal-clear ice you need to utilize this formula:


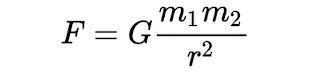
Lovers of science will recognize that as Newton's Universal Law of Gravitation. And when it is applied to ice, you get perfectly shaped, crystal-clear ice balls. As it happens, the white impurities you see in regular ice cubes are, in fact, heavier than water. But if your ice maker is a single level container, those impurities have nowhere to go and end up in the cube.


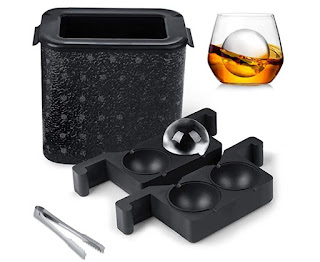
Using Newton's Law of Universal Gravitation, there is a very inexpensive and simple way for you to make perfect ice balls. Amazon has a bunch of these....a 2-ball mold is $39 and a 4-ball mold is $59. They work by being a 2-story tall container. You fill them with warm water and then slide the mold in at the very top. Because the impurities are heavier than water, they sink to the bottom. Gravity is your friend. So what is left behind in the upper mold is a crystal-clear ball of ice.

After 24 hours, you slip the mold out and retrieve your perfect ice balls. Then you get rid of the lower level of ice because that is full of impurities. While I'm not a whiskey drinker, I know whiskey connoisseurs swear by these ice balls. I like to use mine with a few shots of Belvedere Vodka. First, the crystal-clear ice ball looks great in a leaded crystal glass. Second, it is pure H2O ice and does not compromise the flavor of your beverage of choice. Finally, because the ice ball has much less surface area than a glassful of ice cubes, it melts dramatically slower and does not water down your drink. What's not to love about that? 

Ice Balls! Shout it out!


Saturday, January 15, 2022

Korean BBQ Tacos


This is an oldy but goody. In fact, it's beyond good....it's great. It's one of my all-time favorite recipes and I make it at least once a month. But it's buried here in my blog....way back in 2011. Back then I was lucky to have 7 visitors a week. Now it's up to 700 a week. So it's time to share this incredibly delicious and simple recipe again with a much larger audience.


What makes this recipe so simple is that all of the prep work on the main ingredient is already done for you. Costco sells this heavenly pulled pork that has spent 18 hours bathing in the perfect amount of hickory smoke. All you have to do is heat in your microwave for 7 minutes and then combine it with the ingredients listed below. After you taste this awesome Korean BBQ Taco, you will understand why I have made this meal 132 times over the last 11 years.


MAIN INGREDIENTS
2 lbs Kirkland Smoked Pulled Pork
12 flour tortillas, 8" diameter (I like the "Extra Fluffy" ones :-) 

BBQ SAUCE INGREDIENTS
4 tablespoons of Sambal Oelek (fresh chili paste)
4 tablespoons sugar
4 tablespoons of soy sauce
2 teaspoons of rice wine vinegar
4 teaspoons sesame oil

*You can substitute with chili paste (sambal oelek). This is in the Asian section at your grocery store.

TACO FILLINGS
Korean Cucumber Pickles (recipe below)
Fresh bean sprouts
Thinly sliced Napa cabbage
Green onions, cut in 1/2" pieces
Sriracha Sauce


DIRECTIONS
  1. Make the BBQ sauce by whisking all ingredients together until sugar has dissolved and the mixture is smooth.
  2. Heat pulled pork in microwave or on stove top per packaging instructions.
  3. Separate pork with a fork and place in a large saucepan. Pour in BBQ sauce and mix well. Turn heat on low to warm the pork and sauce mixture.
  4. Spoon  a small amount of pork into a tortilla and let your guests add their own taco fillings.


KOREAN CUCUMBER PICKLES
1 large English cucumber, very thinly sliced (mandoline sliced is ideal)  
2 tablespoons rice vinegar
1/2 teaspoon sugar
1/2 teaspoon salt

  1. Mix all ingredients. I like making it an hour in advance so that "pickles" stay crisp. 


Wine pairing: Sauvignon Blanc or Zinfandel


Saturday, January 8, 2022

Szechuan Beef


In all of my years of cooking, I've always made my rice in a sauce pan. But twice in the last 2 weeks I had two attempts go bad. A batch of basmati rice was overcooked and really dry. Then I undercooked a batch of sticky rice. So I decided to do some research on rice cookers.

Rice cookers are ubiquitous in Japan. It is the most important appliance in every household. That's because rice is the most important food in Japan. Not only is it served with every meal....I learned it's the main course of every meal. The protein and veggies are simply side dishes to the rice.

In Japan, rice cookers serve 2 important purposes. First and foremost, a rice cooker means that every grain of rice is perfectly cooked....every time. Second, rice cookers are capable of holding the cooked rice at the perfect serving temperature for 12+ hours. Make one giant batch of rice in the morning and you have perfect, hot rice available for every meal of the day.

Japanese consumers can choose from hundreds of models. Each family is so dependent on their rice cookers, that the retail centers host a huge number of stores that specialize in rice cooker repairs. If your rice cooker is broken, you bring it in to the repair store and they give you a loaner to use until yours is fixed. It is unthinkable that any Japanese family would have to go without their rice cooker for a few days.


After many days of extensive research, I purchased a Zojirushi Ns-Zcc10 5-1/2 Cup Neuro Fuzzy Rice Cooker And Warmer. The company is over 100 years old and their rice cookers are considered the gold standard. They are also one of the few Japanese rice cooker manufacturers that make rice cookers for markets outside of Japan. While they offer a whole range of rice cookers, some of which cost over $2,000, I got mine from Amazon for $187.

I made my first batch last Tuesday. It was so different than any rice I had made in a pan. Every grain was perfectly cooked and plump with moisture. So should everyone have a rice cooker? No. It's not necessary. I got by for 69 years without one. The Japanese need one because they eat 3 meals a day with rice as the main course. For me it's worth it because we eat rice 2 to 3 times a week and I appreciate that it turns out significantly better rice than I am capable of making with a pan. If you are eating rice less than 2 or 3 times a week, don't bother.

So what to serve with that perfect rice? Here's a fabulous  Szechuan Beef recipe by Sam the Cooking Guy...one of my very favorite YouTubers.


INGREDIENTS
1 flank steak, sliced very thin
1/4 cup corn starch
Salt and pepper

5 tablespoons soy sauce, divided, 
2 tablespoons hoisin sauce
1 tablespoon sesame chili oil
2 tablespoons brown sugar
1 tablespoon corn starch
1/4 cup beef broth

1 red bell pepper, cut into thin, 1-inch pieces 
Vegetable oil 
1 teaspoon red pepper flakes
1 tablespoon Szechuan peppercorns, finely crushed (optional)
2 garlic cloves, minced
2 teaspoons finely minced ginger


DIRECTIONS
  1. Place steak in a bowl with the 1/4 cup of cornstarch, 2 tablespoons soy sauce, a little salt and pepper. Mix well and set aside.
  2. Combine remaining 3 tablespoons of soy sauce, hoisin sauce, chili oil, brown sugar, 1 tablespoon corn starch and broth. Mix well and set aside.
  3. Heat a couple of tablespoons of oil in a wok (or large pan) over high heat.
  4. Cook the steak in batches...each batch should be comprised of a singe layer of steak. Cook each batch for 2 minutes per side until the steak is a deep golden brown. As each batch is cooked, place in a bowl.
  5. When steak is all done, add oil to the empty wok and cook red pepper and onion until they just start to soften (about 3 minutes). Then add red pepper flakes and peppercorns. Stir to mix well.
  6. Add garlic and ginger to the wok. Stir until fragrant, then add beef back to the wok with any juices.
  7. Sir to mix, then add the sauce. Stir for 30 seconds, then serve.


Wine pairing: Zinfandel


Saturday, January 1, 2022

Crab Linguine with Lemon Cream Sauce


Alaskan King Crab is the meal Becky and I always eat to usher in the New Year. I like to heat the crab legs in the smoker, but it was below zero in Minnesota last night so I just broiled them in the oven. I always cook more than we can eat on New Year's Eve, so I decided to look for some recipes where I could put leftover crab to use.

I actually stumbled into this recipe. I was reading a review on Costco's lobster ravioli and the author was lamenting that there wasn't much lobster in their product. So to make it more seafood forward, he created a crab cream sauce to serve with the ravioli. But after reading the recipe, I did a quick exit, stage right. I could see that the sauce was going to be incredibly runny and he called for using imitation crab legs (oh, the horror).

So I started searching for a legitimate crab and cream sauce recipe and was fortunate to find my way to one created by Molly Meehan. Like me, she's just a home cook but in love with the hobby and I could tell in an instant she had created a superb recipe. So I'm going to share it with you today. It's good enough that you could use it as a meal for special guests....but it will still work if you just want to make the sauce to compensate for Costco's lack of lobster in their lobster ravioli.


INGREDIENTS
1 pound of linguine
1 cup heavy cream
1 garlic clove, minced
Zest of 2 lemons
Juice of 1 lemon
1 pound of shredded Alaskan king crab or jumbo lump crab
Salt and pepper to taste 
Pinch of red pepper flakes
Grated parmesan cheese
Lemon slices for garnish


DIRECTIONS
  1. Bring a large pot of salted water to a boil. Add the pasta and follow package directions to cook al dente. Reserve 1 cup pasta water before draining.
  2. While pasta is cooking, add cream and garlic to a large skillet set over medium heat. Stir in lemon zest and juice and heat the cream until the edges just start to bubble. Season cream with salt, pepper and red pepper flakes. Keep cream warm until pasta is done.
  3. Add cooked pasta to cream sauce and toss with tongs to combine. Add a few splashes of pasta water to help form a creamy sauce.
  4. Keep tossing and stirring until sauce thickens and coats noodles well (about 3 minutes). If sauce is not thick enough, keep stirring and increase heat just slightly to help extra moisture evaporate.
  5. Stir in crab and remove pan from heat. Toss to combine crab and warm it through. Adjust with salt and pepper to taste.
  6. Serve pasta immediately, garnished with parmesan cheese and lemon slices.


Wine pairing: A big, oaky Chardonnay